VMware Cloud Foundation(VCF)5.2.1 に構築したスーパーバイザーの vSphere 名前空間に、Active Directory(AD)ユーザーでログインしてみます。
前回はこちら。
今回の内容です。
今回の環境
VCF 5.2.1 の VI Worklaod Domain で、スーパーバイザーを構築してあります。
vSphere 名前空間は、下記のように作成してあります。
1. kubectl の準備
kubectl は、下記の投稿でインストールしたものを使用します。
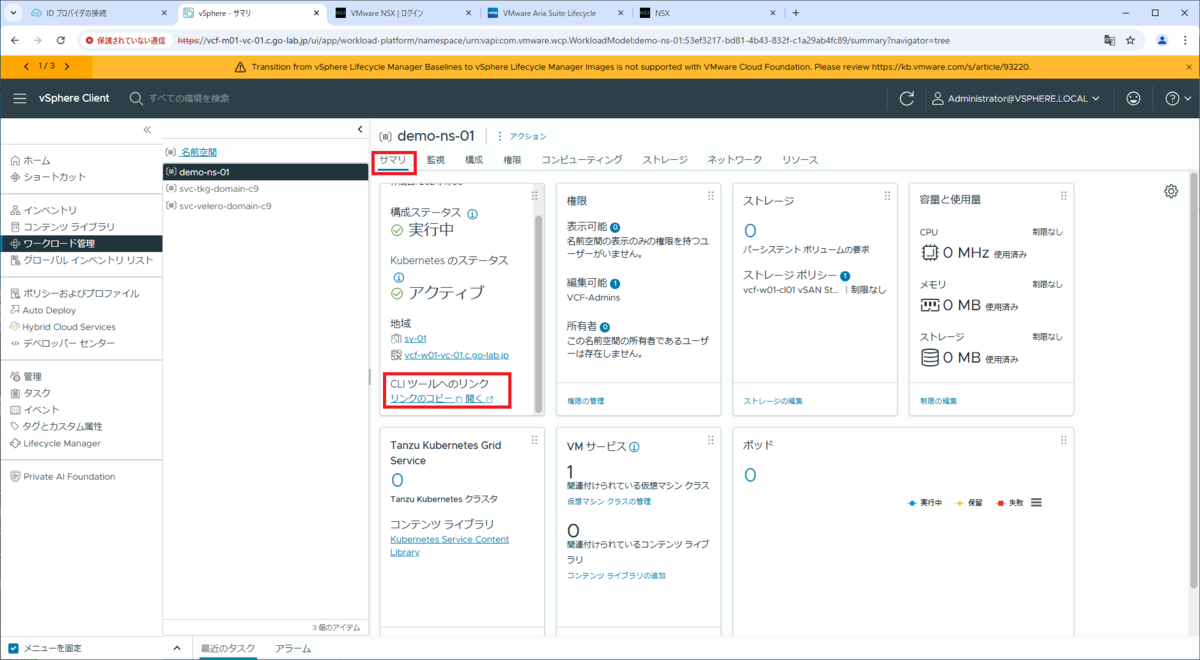
ちなみに、スーパーバイザーを制御プレーンの提供する kubectl のダウンロード ページは、vSphere 名前空間の「サマリ」タブにあるリンクからでもアクセスできます。

2. vSphere 名前空間への接続
kubectl vsphere login で、スーパーバイザーに接続します。今回は、vSphere 名前空間に「編集」(Edit)権限を付与してある VCF-Admins グループ メンバーでログインしています。
- ユーザー:vcf-admin@c.go-lab.jp(VCF-Admins グループ メンバー)
コマンドの実行例です。
- スーパーバイザー制御プレーンの IP アドレス:192.168.82.2
- ユーザー名:vcf-admin@c.go-lab.jp
kubectl vsphere login \
--server 192.168.82.2 \
--vsphere-username vcf-admin@c.go-lab.jp \
--insecure-skip-tls-verify
実際にコマンドを実行すると、スーパーバイザーにログインしたタイミングで、作成されている vSphere 名前空間と同名のコンテキスト(例では demo-ns-01)が作成されます。
gowatana [ ~ ]$ kubectl vsphere login --server 192.168.82.2 --vsphere-username vcf-admin@c.go-lab.jp --insecure-skip-tls-verify


Password:
Logged in successfully.

You have access to the following contexts:
   192.168.82.2
   demo-ns-01

If the context you wish to use is not in this list, you may need to try
logging in again later, or contact your cluster administrator.

To change context, use `kubectl config use-context <workload name>`
gowatana [ ~ ]$
ログイン後、vSphere 名前空間と同名のコンテキストに切り替えておきます。
gowatana [ ~ ]$ kubectl config use-context demo-ns-01
Switched to context "demo-ns-01".
現在ののコンテキストが、demo-ns-01 に切り替わったことが確認できます。
gowatana [ ~ ]$ kubectl config current-context
demo-ns-01
3. vSphere 名前空間リソースの確認(AD ユーザー)
vSphere Kubernetes Service(VKS、旧 Tnazu Kubernetes Grid Serivce)のクラスタを作成するには、vSphere 名前空間に、仮想マシン ストレージ ポリシーと仮想マシン クラスが作成されている必要があります。これらは、VKS クラスタを作成する際に、YAMLファイルでも指定することになります。
そこで、kubectl でも設定状況を確認しておきます。
3-1. 仮想マシン ストレージ ポリシーの確認
仮想マシン ストレージ ポリシーは、スーパーバイザーでは Kubernetes の StorageClass(SC)リソースに紐づけて扱われています。そして、ストレージ ポリシーと SC は、かならずしも同名とは限りません。
SC は管理者(Administrator@vsphere.local)としてログインしている場合には、下記のように確認できます。
gowatana [ ~ ]$ kubectl get storageclasses.storage.k8s.io
NAME                                       PROVISIONER              RECLAIMPOLICY   VOLUMEBINDINGMODE   ALLOWVOLUMEEXPANSION   AGE
management-storage-policy-encryption       csi.vsphere.vmware.com   Delete          Immediate           true                   31h
management-storage-policy-regular          csi.vsphere.vmware.com   Delete          Immediate           true                   31h
management-storage-policy-single-node      csi.vsphere.vmware.com   Delete          Immediate           true                   31h
management-storage-policy-stretched-lite   csi.vsphere.vmware.com   Delete          Immediate           true                   31h
management-storage-policy-thin             csi.vsphere.vmware.com   Delete          Immediate           true                   31h
vcf-w01-cl01-vsan-storage-policy           csi.vsphere.vmware.com   Delete          Immediate           true                   31h
vm-encryption-policy                       csi.vsphere.vmware.com   Delete          Immediate           true                   31h
vsan-default-storage-policy                csi.vsphere.vmware.com   Delete          Immediate           true                   31h
しかし非管理者では権限が制限されており、「kubectl get storageclasses ~」では情報を確認できなかったりします。
その場合は、vSphere 名前空間に作成されている StoragePolicyUsages などで、SC の名前を確認できます。
gowatana [ ~ ]$ kubectl get storagepolicyusages.cns.vmware.com -n demo-ns-01
NAME                                         AGE
vcf-w01-cl01-vsan-storage-policy-pvc-usage   57m
下記のように、StoragePolicyUsages から SC の名前(vcf-w01-cl01-vsan-storage-policy)がわかります。
gowatana [ ~ ]$ kubectl get storagepolicyusages.cns.vmware.com -n demo-ns-01 vcf-w01-cl01-vsan-storage-policy-pvc-usage -o yaml
apiVersion: cns.vmware.com/v1alpha1
kind: StoragePolicyUsage
metadata:
  creationTimestamp: "2024-11-30T01:58:57Z"
  generation: 1
  name: vcf-w01-cl01-vsan-storage-policy-pvc-usage
  namespace: demo-ns-01
  resourceVersion: "1193674"
  uid: 937c6b63-c8bd-4178-8f86-d8d31ee5d6a6
spec:
  resourceApiGroup: ""
  resourceExtensionName: volume.cns.vsphere.vmware.com
  resourceKind: PersistentVolumeClaim
  storageClassName: vcf-w01-cl01-vsan-storage-policy
  storagePolicyId: 622dd5cb-f102-45d0-a997-fc3b4f180aaf
status: {}
3-2. 仮想マシン クラスの確認
vSphere 名前空間に割り当てられている仮想マシン クラスは、kubectl get virtualmachineclasses で取得できます。期待どおり、best-effort-small が割り当てられています。
gowatana [ ~ ]$ kubectl get virtualmachineclasses.vmoperator.vmware.com -n demo-ns-01
NAME                CPU   MEMORY
best-effort-small   2     4Gi
つづく。