vSphere 8.0 U2 で、vSphere with Tanzu の自宅ラボ環境を構築していきます。今回は、kubectl でスーパーバイザーに接続してみます。
今回の内容です。
- ラボ構成のイメージ
- 実行環境について
- 1. kubectl と vSphere Plug-in のダウンロード
- 2. kubectl と vSphere Plug-in のインストール
- 3. スーパーバイザーへのログイン
ドキュメントでは、下記のあたりが参考になります。
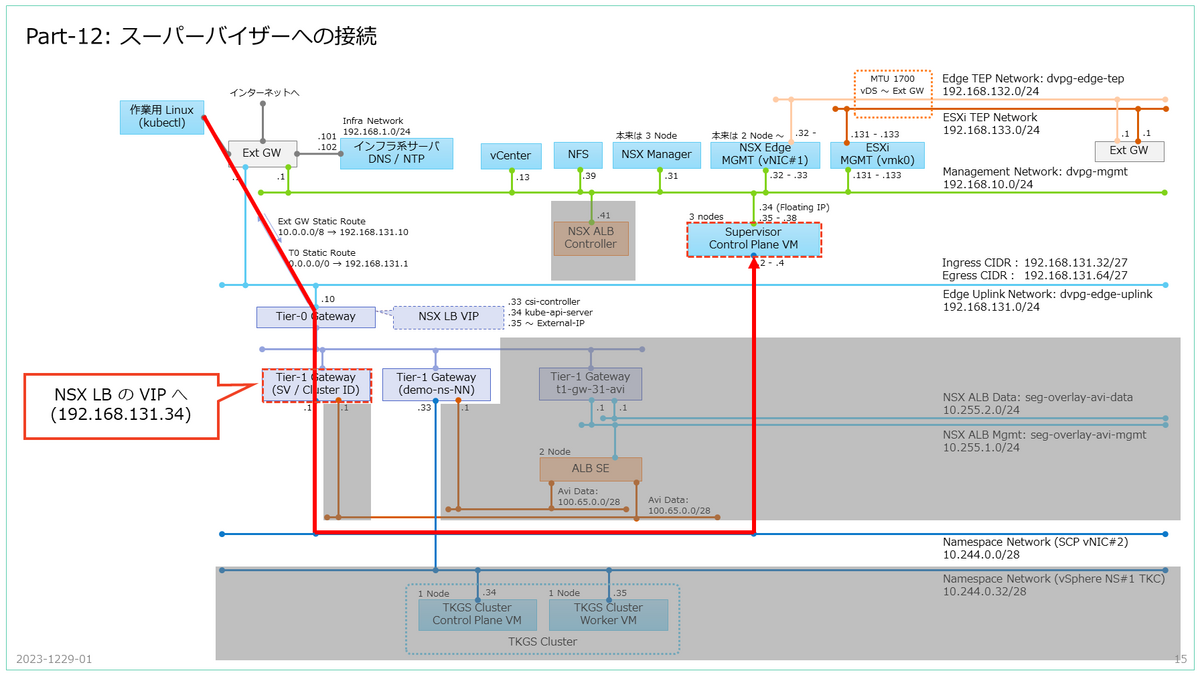
ラボ構成のイメージ
今回は、kubectl でスーパーバイザーの制御プレーンに接続します。NSX LB の VIP 経由で、Supervisor Control Plane VM の vNIC#2 側(オーバーレイ ネットワーク)に接続します。
実行環境について
今回は、kubectl を実行するクライアントとして Linux(VMware Photon OS 5.0)を利用しています。
# cat /etc/photon-release
VMware Photon OS 5.0
PHOTON_BUILD_NUMBER=dde71ec57
Photon OS はデフォルトのパッケージが少ないので、あらかじめ root ユーザで、次の RPM を追加インストールしておきます。
- unzip: kubectl の zip ファイル(vsphere-plugin.zip)の解凍のため。
RPM パッケージは、tdnf コマンドでインストールします。
# tdnf install unzip -y
1. kubectl と vSphere Plug-in のダウンロード
まず、vSphere 専用の kubectl と Plug-in をダウンロードします。
スーパーバイザーに作成した名前空間の「サマリ」タブにある「CLI ツールへのリンク」の、「開く」リンクをクリックすると、ダウンロード ページが開けます。
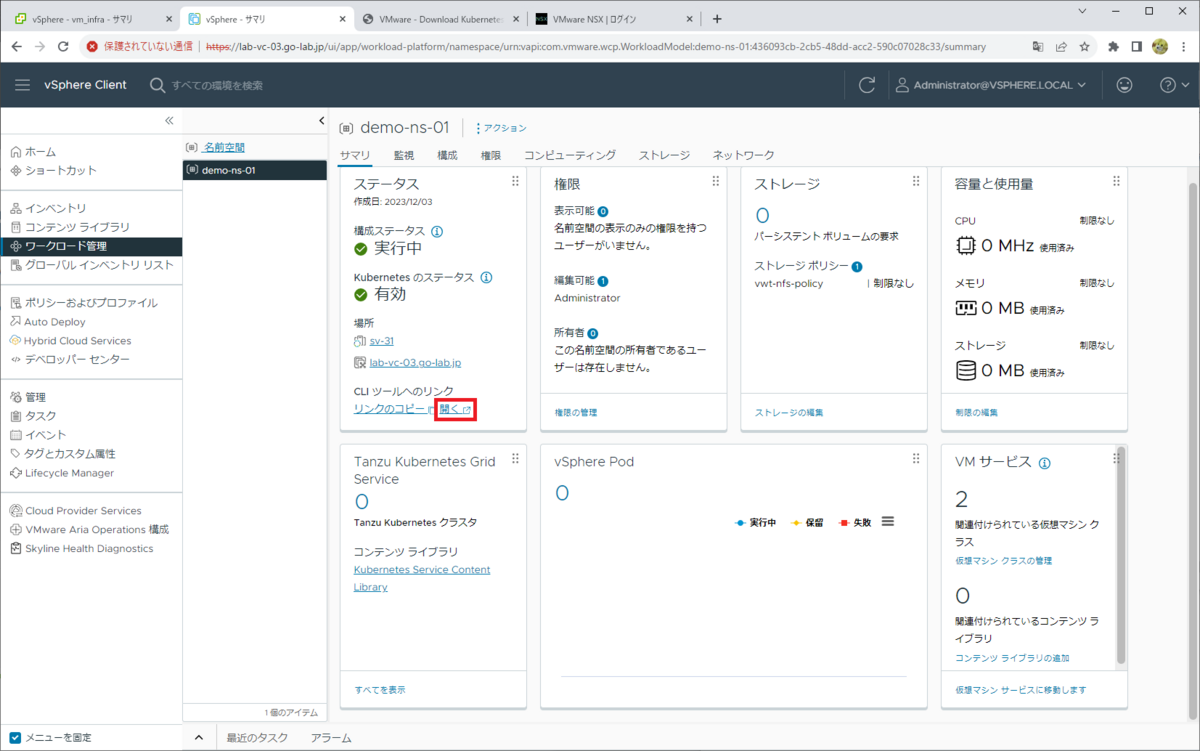
Supervisor Control Plane VM による「Kubernetes CLI Tools」ページが開くので、「SELECT OPERATING SYSTEM」リンクで、「Linux」を選択して、ダウンロードします。
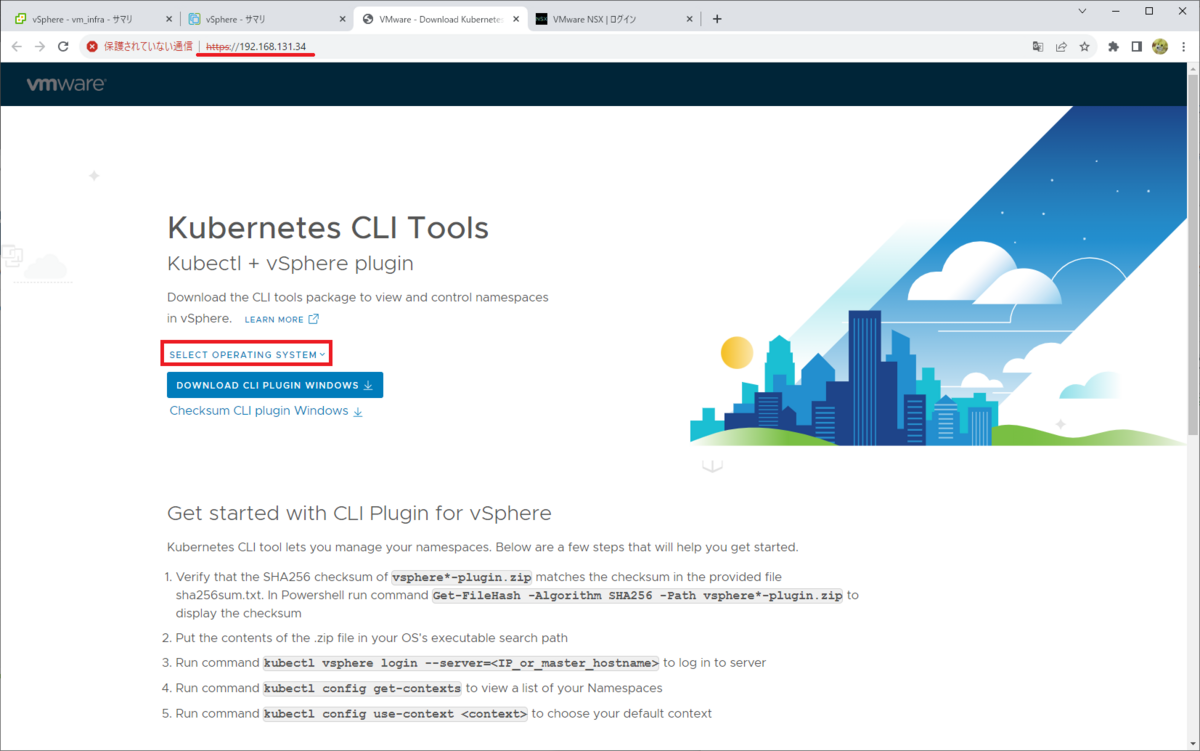
もしくは、curl コマンドなどで直接ダウンロードできます。このダウンロードには、ユーザ認証は不要です。
スーパーバイザーの制御プレーン IP アドレス「192.168131.34」であれば、下記のコマンドで Linux 用のファイルがダウンロードできます。
$ curl -k -L -O https://192.168.131.34/wcp/plugin/linux-amd64/vsphere-plugin.zip
2. kubectl と vSphere Plug-in のインストール
Linux に、ダウンロードした kubectl 一式をインストールします。
zunzip でファイルを解凍すると、中に kubectl と、スーパーバイザー クラスタに接続するための kubectl プラグイン(kubectl-vsphere)が入っています。
$ unzip vsphere-plugin.zip
Archive:  vsphere-plugin.zip
   creating: bin/
  inflating: bin/kubectl-vsphere
  inflating: bin/kubectl
kubectl に PATH を通しておきます。今回は、カレント ディレクトリ直下の bin ディレクトリに、kubectl が展開されています。
$ export PATH=$(pwd)/bin:$PATH
kubectl version を実行できることで、PATH が通っていることを確認します。
$ kubectl version --client --short
Flag --short has been deprecated, and will be removed in the future. The --short output will become the default.
Client Version: v1.26.4+vmware.wcp.0
Kustomize Version: v4.5.7
kubectl で Bash の Tab キー補完を利用するためのコマンドラインを実行しておきます。ちなみに、Photon OS ではデフォルトで Bash の補完機能が有効ですが、RHEL や CentOS などを利用する場合には、bash-completion の追加インストールが必要です。
$ source <(kubectl completion bash)
ダウンロードした kubectl では、プラグインにより、一般的な kubectl にはない「kubectl vsphere ~」といったコマンドが実行できます。
$ kubectl vsphere --help
vSphere Plugin for kubectl.

Usage:
  kubectl-vsphere [command]

Available Commands:
  completion  Generate the autocompletion script for the specified shell
  help        Help about any command
  login       Authenticate user with vSphere with Tanzu namespaces
  logout      Destroys current sessions with all vCenter Namespaces clusters.
  version     Prints the version of the plugin.
  vm          Access a VM's web console.

Flags:
  -h, --help                     help for kubectl-vsphere
      --request-timeout string   Request timeout for HTTP client.
  -v, --verbose int              Print verbose logging information.

Use "kubectl-vsphere [command] --help" for more information about a command.
「kubectl vsphere login」で、Supervisor Control VM のアドレス宛にログインします。
$ kubectl vsphere login --help
Authenticate user with vSphere with Tanzu namespaces:
To access Supervisor and Tanzu Kubernetes clusters, you must first authenticate against vSphere with Tanzu namespaces.
You must pass the address of the Supervisor API endpoint and the username of the user to authenticate, and will be
prompted to provide further credentials.

Usage:
  kubectl-vsphere login [flags]

Examples:
kubectl vsphere login --vsphere-username user@domain --server=https://10.0.1.10

Flags:
  -h, --help                                        help for login
      --insecure-skip-tls-verify                    Skip certificate verification (this is insecure).
      --server string                               Address of the server to authenticate against.
      --tanzu-kubernetes-cluster-name string        Name of the Tanzu Kubernetes cluster to login to.
      --tanzu-kubernetes-cluster-namespace string   Namespace in which the Tanzu Kubernetes cluster resides.
  -u, --vsphere-username string                     Username to authenticate.

Global Flags:
      --request-timeout string   Request timeout for HTTP client.
  -v, --verbose int              Print verbose logging information.
3. スーパーバイザーへのログイン
kubectl vsphere login コマンドで、スーパーバイザーにログインします。
- 接続先は vCenter のアドレスではなく、Supervisor Control VM の VIP アドレスです。
- このラボでは、192.168.131.34 です。
- これは、さきほどの 「Kubernetes CLI Tools」ページと同じアドレスです。
- 証明書エラーを回避するため、「--insecure-skip-tls-verify」を指定しています。
- 今回は、vCenter の名前空間で権限を付与したユーザでログインします。
- ここでは「administrator@vsphere.local」ユーザでログインします。
- パスワードは、環境変数「KUBECTL_VSPHERE_PASSWORD」に格納しておくとキー入力が不要になります。
kubectl vsphere login を実行すると、次のようになります。ログインに成功すると、自動的にコンテキストが作成されます。
$ export KUBECTL_VSPHERE_PASSWORD='VMware1!'
$ kubectl vsphere login --server=192.168.131.34 -u administrator@vsphere.local --insecure-skip-tls-verify

Logged in successfully.

You have access to the following contexts:
   192.168.131.34
   demo-ns-01

If the context you wish to use is not in this list, you may need to try
logging in again later, or contact your cluster administrator.

To change context, use `kubectl config use-context <workload name>`
表示されてたコンテキストのうち、vSphere 名前空間「demo-ns-01」にアクセスできる、同名のコンテキストに切り替えます。
$ kubectl config use-context demo-ns-01
Switched to context "demo-ns-01".
これで、下記のようにスーパーバイザーを構成する Kubernetes ノードの情報が確認できるはずです。
$ kubectl get nodes
NAME                               STATUS   ROLES                  AGE   VERSION
423b1465148eb0f9b6a982f772d52e8e   Ready    control-plane,master   25h   v1.26.4+vmware.wcp.0
423b54c5dce6cae8bb2d02bfd8c85b93   Ready    control-plane,master   25h   v1.26.4+vmware.wcp.0
423b829e7e9a14239dced9a2624c1255   Ready    control-plane,master   26h   v1.26.4+vmware.wcp.0
lab-esxi-131.go-lab.jp             Ready    agent                  25h   v1.26.4-sph-79b2bd9
lab-esxi-132.go-lab.jp             Ready    agent                  25h   v1.26.4-sph-79b2bd9
lab-esxi-133.go-lab.jp             Ready    agent                  25h   v1.26.4-sph-79b2bd9
つづく。